Want to Improve your Instrument Setup Time?


1. Always use a good heavy duty tripod in good condition (no loose parts).
2. Setup the tripod about chest high over the point.
3. Always use a good wide stance for stability.
4. Always carry the instrument by the carrying handle with one hand under the instrument for support.
5. Attach the instrument to the tripod using the bell housing mount.
6. Using the optical plummet or laser plummet use two legs to place the instrument over the point. Place the toe of your boot near the point to make it easier to find.
7. Firmly plant the tripod feet in the ground using all your weight. Jump up and down on it if you like, you will not break the tripod!
8. Level the instrument by adjusting the tripod legs - don't worry about the optical plummet just yet.
9. Fine adjust the bullseye bubble with the leveling screws.
10. Now, using you optical or laser plummet check the position over the point. Loosen the bell housing and slide the instrument over the point and tighten the bell housing back up (don't over tighten).   The tribrach should not hang over the tripod head at any time.
11. Now level the long bubble or electronic bubble to where it is center in two faces 90 degrees from one another (don't chase your tail).
12. Check your position over the point and make any corrections.
13. Check your level again.
14. Once you have a level instrument and it is over the pint you should be ready to sight in on the backsight and set your zero!


Check out this video for some tips!


Using Weighted Average in TopSURV


You can use the weighted average function in TopSURV if you repeat an observation on a point in topo by using the same point number. I will generally use this feature when setting control with RTK. 

1. Make an observation on your control point. I recommend collecting an average of 30 epochs or more. 

2. After logging your point make a second observation on the same point using the same point number.

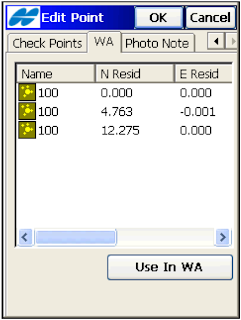
3. When prompted select Use as a Check point, Use in weighted average.

If you use more than two observations you can throw out any outliers in the weighted average tab.

From the TopSURV User Manual: The WA (Weighted Average) tab appears on the Edit Point screen if the point has check points which are used in a weighted average. To exclude a station from a weighted average, highlight the station. Use the Exclude from WA / Use in WA button to exclude / include the highlighted station in averaging.


>See this walk through video 

TopSURV Configurations

Here are a few TopSURV configuration walk throughs for my Military survey friends using the equipment listed below. If you have any questions, comments, or corrections needed drop me a line.

GR-3 Post Processing (Static)

GR-3 Internal Radios (RTK)


GR-3 with TRL-35 (RTK )


GPT-9000 Robotic Configuration (RC-3)

GPT-9000 Conventional/Reflectorless Configuration


DL-101C Auto Level Configurations

Display Background Images in Topcon Tools


The Map and CAD View displays a background image for a work area. Topcon Tools can open only georeferenced image as a background. (Georeferencing of the image establishes the relationship between pixel coordinates and real datum/grid/ground/local coordinates).

If the image is not georeferenced, Topcon Tools can calculate the relationship with the desired coordinate system. To do this, the user has to have the coordinates of the ground control points in the given coordinate system.

I will often use Images from Google Earth to use for my background. In Google Earth I zoom to the desired area for my background and export the image to a JPG format. I will then import and georeference the image in Topcon Tools using the Background Images tools. Remember to do this properly you will need to have coordinates on identifiable points in the image. If you want to create a quick georeferenced image you can get the Lat/Lon coordinates for points in Google Earth and use them create points in Topcon Tools. Convert the Lat/Lon coordinates in Tools to your plane coordinate system (State Plane, UTM,...). This is a nice trick but can be a little drawn out. Hopefully Topcon Tools will soon come up with an automated Google Earth to background image, like AutoCAD, in the future. Below is some detail information from the Topcon Tools user manual, but it is much easier to import an image and georeference than what the manual indicates.   To add a vector or raster image as background to the current job, do the following:

1. Click View > Background images.

2. Click the Add Image button in the Background images dialog box

3. Select the Add Image Button
Select the desired image file in the Open dialog box, and then click Open. This image will be displayed in the left panel (Available Images) of the Background images dialog box. An unlimited number of images can be activated in this panel.

4. Select the needed background image in the left panel and click the double arrows button. This image will display in the right panel (Images used in the jab) of the Background images dialog box. If the coordinate system of the selected image is the same as the job’s coordinate system, this image will be marked with a green icon in the right panel and displayed in the Map and CAD views.
                                                                            
5. Be sure that the Show Background Map entry box is checked (enabled) for the Map/CAD View (To see this check box, right-click on the Map/CAD view, then select Option from the pop-up menu).

View Video Here